Machine Learning Classification Model and Inference Processor: Implementation using Elasticsearch and Siren
Elastic Classification is a task that requires the use of machine learning algorithms that learn how to assign a class label, based on the input data set. For example, there are two classes to identify whether an email is spam or not.
With the use of classification jobs, you can predict the class or category of a data point in your data set. It can be used in any domain, such as flight prediction, credit card approval requests, Target Lead, Trading, Arrest Prediction, etc.
In this article, we will use machine learning in the Elastic Stack, all you really need is for your data to be stored in Elasticsearch. Once the data set is clearly known and you know which class you need to use for classifying the model then it’s a simple step to create a Classification Job on the data set.
Why Siren?
By combining Elastic and Siren for the classification job, we can compare how the classification model is performing on the newly-ingested data with dashboards.
Elastic provides a way to use the trained model in ingestion pipelines. This, in turn, opens up an avenue to use machine learning models to enrich your data at ingestion time. You can use the Inference processor, which will help you to classify the data based on your classification model to the newly ingested data and predict the result on a new data set.
Siren dashboards and visualizations will provide us with detailed information about the model performance easily and identify if the trained model is the perfect fit for the new data set ingested.
Siren Visualizations
For this demo, we used the Machine learning and Inference processor to create the machine learning classification job in Elastic, and applied it to crime data that was produced in 2018 and 2019.
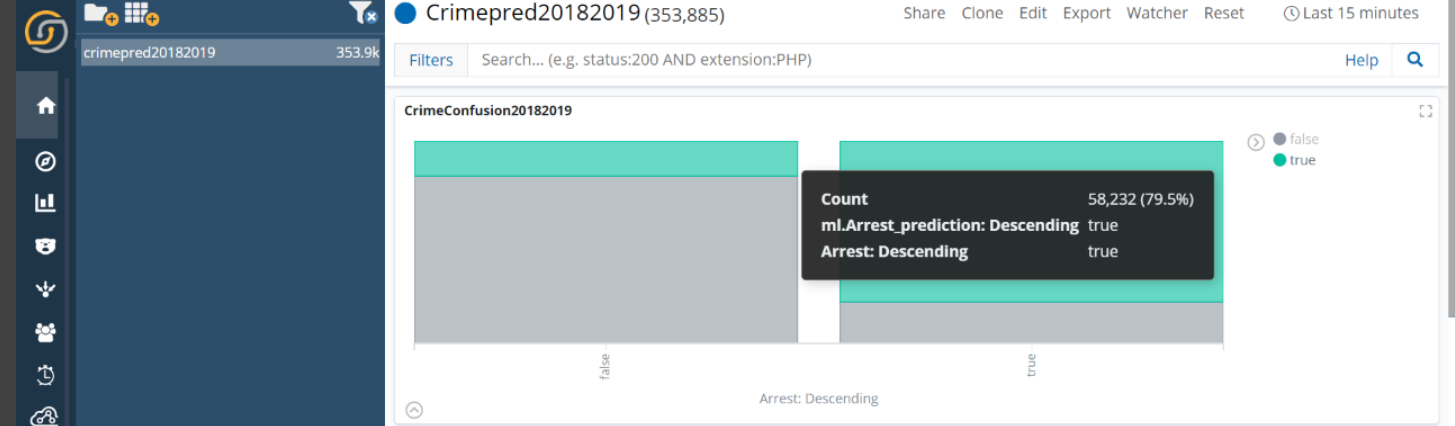
Confusion Matrix - We used the Vertical bar chart in Siren to evaluate and compare the performance of both of the models of the newly-ingested data streaming into Elasticsearch.

Each bar here represents instances of the actual prediction vs. the machine learning prediction (which is created by the ML classification job or Inference processor).
Thus it gives a measure of true positives in the left vertical bar (grey) where the ML job has predicted Arrest as a false and the Actual result was also False.

False positives are in the left vertical bar (green) where the ML job has predicted Arrest as a true and the Actual result was False.

False negatives are in the right vertical bar (grey) where the ML job has predicted Arrest as a false and Actual result was True.
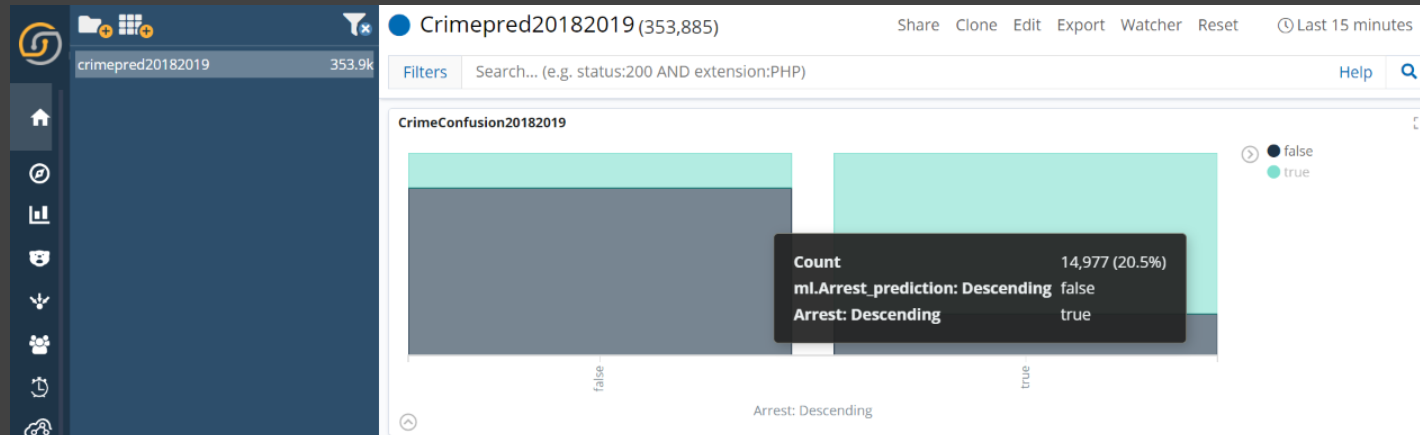
True negatives are in the right vertical bar (green) where the ML job has predicted Arrest as a true and Actual result was also True.
Siren Investigate Scripting API
Siren Investigate comes with a feature called Sirenapi. It allows you to write a script and attach it to a dashboard or visualization to do things that are not (yet) included in the application. Such scripts are written in javascript and can do multiple things, like:
- fetch data from Elasticsearch;
- manipulate filter, queries, and time on the dashboard;
- do custom computation and data manipulation;
- create custom HTML forms;
- react on various events emitted by the API;
- manipulate nodes on graphs;
- call Investigate web services;
- etc…
All of the above allow our customers to customize the application’s behavior and add new custom panels to the dashboard.
In this scenario, we used the APEX chart visualization to compare the Real vs. Predicted Arrest values yearly. We can customize this viz by directly changing into the scripting panel scripts.

Prerequisites
- Elasticsearch with Elastic Stack security and the supported Siren Federate version.
- Siren Platform.
- Kibana for model training.
Model Training
In our example, we have used the Chicago crime 2018-19 data to create the job.
Once the data is ingested in Elasticsearch and the index pattern is created, we start creating the job for model training.
We will create a job using the Machine Learning app in Kibana.
- Job type: We select “classification” to predict whether a given binary is arrest(true) or arrest(false).
- Dependent variable: The “label” in our case is Arrest.
- Fields to include: We select the fields we would like to include in the training.
- Training percentage: It is recommended that you use an iterative approach to training, especially if you’re working with a large data set (i.e., start by creating a training job with a smaller training percentage, evaluate the performance, and decide if it is necessary to increase the training percentage).
- Additional information options: We’ll leave the defaults as they are, but you can choose to set hyperparameters for the training job at this stage.
- Job details: We’ll assign an appropriate job ID and destination index for the job.
- Create index pattern: We’ll disable this, since we will be creating a single index pattern to match the destination indices for both classification job and Inference Processor in Siren.
Inference Processor
In addition to model training and evaluation, the Elastic Stack also provides a way for a user to use trained models in ingestion pipelines.
Once the model job is created, you can see the output in the Dev Tools app with the Model id, which is required for the Inference Processor Job.
Getting the model_id
If you have a large number of jobs trained, then you can use the following command to get the correct Model id:
GET _ml/inference/crime*
As we have the model_id now, we can create our ingestion pipeline configuration. It references the model we want to use to enrich our documents.
Create the ingestion pipeline by running the following command:
PUT _ingest/pipeline/crime-classification-model

{

"description": "Classifies for Arrest Field",

"processors": [

{

"inference": {

"model_id": "crime201819-1614087180408",

"inference_config": {

"classification": {

"num_top_classes": 5

}

}

}

}

]

}
Once the ingestion pipeline is created, we will ingest the new crime data from 2020 or 2021, which will use the inference processor that has the 2018-19 machine learning model id.
As a result, in our destination index, we now have a new document that has been enriched with the predictions from our trained machine learning model.
If we view the document (for example, using the Discover app), we will see that per our configuration, the inference processor has added the predictions of the trained machine learning model to the document.
